
Introduction to Visual Regression Testing
While working on Labcodes' design system, I learned to have a better appreciation of testing. It helps a lot to know that my changes won't break anything in a project that requires high flexibility components. However, our current test coverage doesn't cover the most important part: that the refactors won't change the visual behavior of our components. When searching for a solution, I got to know about the beautiful world of Visual Regression Testing.
What is it?
Visual Regression Testing consists of having tests that literally take a screenshot of a part of your UI, and check if that UI looks the same as the last time the tests were run. They are usually a part of your end-to-end or integration tests and work well together with tools like Cypress and Playwright, which already use a browser to run assertions. Conceptually, it's close to Snapshot Testing, but instead of saving on disk the HTML/JSX structure of a UI component, they save an image of how the component looks to the end user.

In general, this type of test is useful in scenarios that require strict prevention of visual bugs - perfect for design systems, component libraries or health checks for a production environment. It guarantees that a specific element of the page will always be rendered the same under the same conditions.
This type of test, however, requires a deeper level of configuration if you're not using tools like Playwright or Cypress, so keep that in mind. Same as snapshot tests, it's rare to see visual regression tests running by themselves - these checks are usually made at the end of preexisting e2e/integration tests.
We have two main approaches on how to create and run visual regression tests: by making automatic checks between images inside your test suite; or by using a service like Percy, that requires that someone in your team manually checks the diffs and approves the changes.
First approach: with automatic validation
This approach is really useful for small teams, or teams that can't rely on a design, QA or product person to be there at all times. On this one, we add a check to the end of our e2e/integration tests that calls the automatic check. In a way, it's almost identical to snapshot tests.
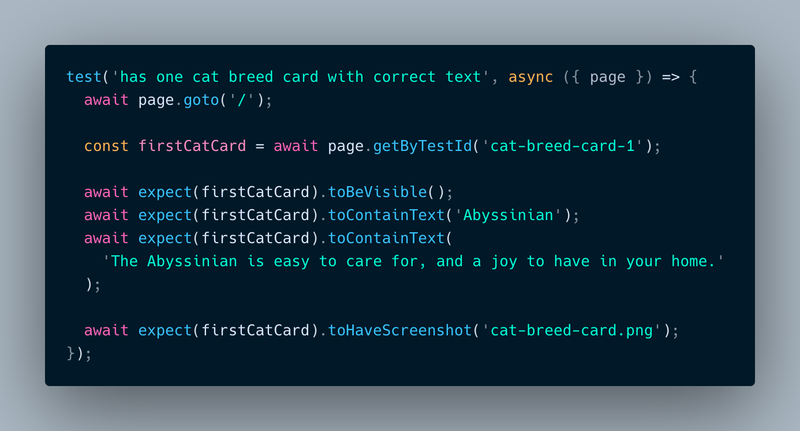
If you're using Playwright, the setup and configuration are already baked in - you just need to add a new assertion to the end of your tests and it will automatically save on disk a print of whatever component you pass to it:
await expect(locator).toHaveScreenshot('filename.png')
For Cypress users, it's a bit more complicated, since it doesn't come with visual regression tools by default. I suggest you use something like the @frsource/cypress-plugin-visual-regression-diff plugin, which is compatible with Cypress >= 10. This approach, while convenient, free to use, and reasonably easy to configure, has a couple of cons to be considered.
Cons of the automatic approach
In my opinion, this approach has two main cons: browser and OS compatibility; and image size that needs to be committed to git.
Each OS and browser renders web interfaces slightly differently - different enough that the comparison between images becomes something a bit hard to be done. For example, if your team has devs that use macOS and Linux, the generated images will be different, and the tests will break when they shouldn't.
To fix this issue, I recommend that you run your e2e/integration tests inside a Docker container. With that, not only everyone on the team will be able to run the tests without false negatives, but you'll be able to also use the Docker image on CI when your code is pushed. If you want to see examples on how to do this, there are reference links at the end of this post. One thing to consider is that the Docker image provided by the Cypress team refused to work on my M1 Mac, so I had to make one myself (and I'm not a Docker pro). Playwright worked perfectly with theirs, though.
The second issue, related to having to commit images to your git repository, in my opinion, isn't a big deal. First of all, we need to keep in mind that this type of assertion is not supposed to be present in all of your tests, only on the most important ones. For example, if we have a button that can have an icon, we only need to add visual regression tests for the default render and for the one with the icon. All other button related tests probably won't really need a visual check.
Another point is that the generated images are usually really small. The one for the sample test above, for example, created a 23kb image. And even if they accumulate over years of development, it's hard to think that they'll make your repo bigger than a simple Docker image; and they'll only need to be downloaded once, when you clone the project. If it ever becomes a real issue, there are also ways to remove them from git history.
Second approach: with manual approval
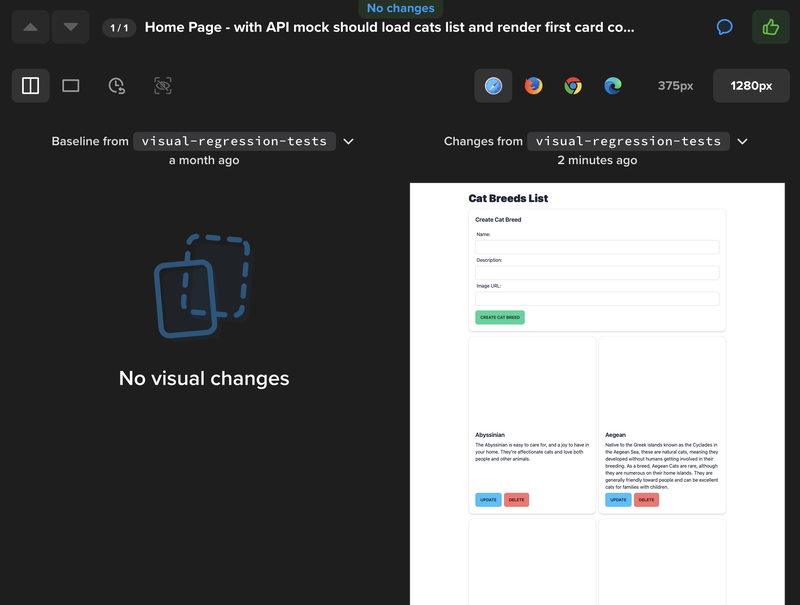
Another way to have visual regression tests is to use tools like Percy or BackstopJS. These platforms are more useful for bigger teams, or teams that have a close relationship with a design, QA or product person.
In this approach, we add to the end of our tests a call to the plugin of the chosen tool. The plugin will be responsible for printing the screen, making them available for manual checks, and providing a UI for the reviews.
If you have a slower, more bureaucratic development process, or your company needs bigger control over how the product is visually presented to the end user, this is the way to go - but it's not free from some issues to consider.
Cons of the manual approach
While you don't need to run your tests in a container or save images to your git repo, this approach tends to be a bit worse for high velocity dev teams, in my opinion, since the checks are not automatic. Also, these services are generally very expensive, or really limited on the free tier. For example, Percy deletes images generated by builds from more than 30 days ago, and 5000 screenshots a month. If you have a big project, you will use them really fast.
Another factor to consider is that this approach creates a bottleneck in the dev process: the person that reviews the changes. If your team or company doesn't have specific people for this kind of work, this will make the whole pipeline slower. Of course, there are cases where this bureaucracy is desired, but this point needs to be very emphasized before you choose this approach.
Lastly, a tip: if you want to wait for someone to validate the visual changes before your Pull Request can be merged and you're using Percy, be sure to connect your Github account to Percy on their settings. Without the connection, your Github PR will be ready to be merged, even if there are visual changes to be approved on Percy.

Testing, testing, testing
At the end of the day, the most important thing is testing. Visual Regression Tests are only one more tool to be added to our utility belt, and it's one to be used carefully and sparingly. Here I leave some references to tools, sites, and code samples about the topic, and if you have any questions or suggestions, please leave them in the comments. I hope you liked this content, and see you next time!
